【Unity】Luban配置教程和按文件加载优化
Github地址:https://github.com/focus-creative-games/luban
官方文档:https://luban.doc.code-philosophy.com/
官方示例工程:https://github.com/focus-creative-games/luban_examples
参考文章:Unity导表工具Luban插件的数据加载原理与优化
一、前言
luban是一个强大、易用、优雅、稳定的游戏配置解决方案,虽然luban配置起来比较麻烦,但是博主依旧愿意向大部分人推荐,这里列举几个自己喜欢的点:
强大的数据校验功能,可以有效避免策划或者程序瞎搞配置表弄出的bug。
支持使用OOP类型继承,极大的丰富了表格的使用方式。
统一了工作流,提高了策划和程序的效率。
当使用C#+bytes时,文件占用小、加载速度快、几乎无GC。
其实除了上面讲的,luban还有很多优势,这里就不一一赘述了。本篇博客主要讲了作为程序在使用luban时的配置和优化,后面或许会再加一篇表构建和运动的帖子。
二、Luban配置和基本使用教程
配置环境
首先,安装dotnet sdk 8.0或更高版本sdk。
然后,下载luban_examples项目。
最后,unity AssetManager使用Git方式安装luban插件:https://github.com/focus-creative-games/luban_unity.git
配置luban
打开luban的实列工程文件夹,这里讲讲四个主要文件夹
- DataTables:一个复杂的配置表文件
- MiniTemplate:一个小的示例,点击
gen.bat后快速生成一个json配置表 - Projects:一大堆各式各样的模板示例
- Tools:编译好的luban的dll和模板
因为博主使用的是C#+bytes的方式,这里以Projects下的Csharp_Unity_LazyLoad_bin为基础讲解,这里贴出
gen.bat的解析,代码和注释如下:1
2
3
4
5
6
7
8
9
10
11
12
13
14
15
16
17
18
19set WORKSPACE=..\..
set LUBAN_DLL=%WORKSPACE%\Tools\Luban\Luban.dll
## LUBAN_DLL是Luban工具Dll的位置
set CONF_ROOT=%WORKSPACE%\DataTables
## CONF_ROOT是表所有的位置
dotnet %LUBAN_DLL% ^
-t client ^
-c cs-lazyload-bin ^
-d bin bin-offsetlength ^
--conf %CONF_ROOT%\luban.conf ^
-x outputCodeDir=Unity/Assets/Gen ^
-x bin.outputDataDir=Unity/Assets/StreamingAssets/Config/bin ^
-x bin-offsetlength.outputDataDir=Unity/Assets/StreamingAssets/Config/offset ^
-x pathValidator.rootDir=%WORKSPACE%\Projects\Csharp_Unity_bin ^
-x l10n.textProviderFile=*@%WORKSPACE%\DataTables\Datas\l10n\texts.json
pauseLUBAN_DLL是luban工具dll的位置CONF_ROOT是表所有的位置outputCodeDir是生成C#代码的位置,为了避免误删,一定要是空文件夹。outputDataDir是bytes文件的输出目录为pathValidator是设置路径验证器的根目录双击
gen.bat后,如果一切正常会以bey~结束,表示配置成功。并在当前Unity\Assets里生成对应的代码和bytes文件。配置Unity
如果unity已经安装了上面的插件,实例工程中有两个脚本需要关注
Main.cs和ConfigManager.cs,main里调用的bytes文件加载和一堆测试用例,这里不做赘述。ConfigManager.cs脚本才是核心的管理类。以下是官方的提供的实例代码:1
2
3
4
5
6
7
8
9
10
11
12
13
14
15
16
17
18
19
20
21
22
23
24
25
26
27
28
29
30
31
32
33
34
35
36
37
38
39
40
41
42
43
44using cfg;
using Luban;
using System.Collections.Generic;
using System.IO;
using UnityEngine;
public class ConfigManager
{
public static Tables tables;
private static byte[] BUFFER = new byte[1024 * 1024 * 10];
private static Dictionary<string, FileStream> fileStreams;
public static void LoadTables()
{
fileStreams = new Dictionary<string, FileStream>(Tables.TABLE_COUNT / 2);
tables = new cfg.Tables(LoadOffsetByteBuf, ByteBufLoader);
}
public static void Dispose()
{
foreach (var fs in fileStreams.Values)
{
fs.Dispose();
}
fileStreams.Clear();
}
private static ByteBuf LoadOffsetByteBuf(string file)
{
var a = File.ReadAllBytes($"{Application.streamingAssetsPath}/Config/offset/{file}.bytes");
return new ByteBuf(a);
}
//注意: 安卓平台和WebGL平台不能读取StreamingAssetsPath下的文件,这里只提供思路,可以根据各自项目情况作出调整
private static ByteBuf ByteBufLoader(string file, int offset, int length)
{
if (!fileStreams.TryGetValue(file, out var fs))
{
fs = new FileStream($"{Application.streamingAssetsPath}/Config/bin/{file}.bytes", FileMode.Open);
fileStreams.Add(file, fs);
}
fs.Seek(offset, SeekOrigin.Begin);
fs.Read(BUFFER, 0, length);
var buf = new ByteBuf(BUFFER, 0, length);
return buf;
}
}通过
ByteBufLoader加载Bytes文件,然后再调用再将加载的ByteBuf数据一一匹配给Tables变量中的变量。需要注意的地方是,需要根据文件的位置和项目的加载方式修改
ByteBufLoader函数,比如可以换成ab包加载。Tables是luban自动生成的,不要随意修改代码,以免被覆盖。
三、Luban优化教程
通过学习官方的实例工程,可以发现一个问题,所有的数据都是一次性全部加载的,这并不合理,尤其是既需要游戏初始化时加载一些数据,又有很多大文件,这会造成浪费内存拖慢启动。所以这里给出一个按文件加载的优化方案。这里参考了大佬明天不吃鱼的帖子Unity导表工具Luban插件的数据加载原理与优化。
这里和大佬不一样的地方有两个,一个是大佬用的是c#+json的方案,博主使用的c#+bin,另一个是博主在大佬的基础上添加了引用解析。核心思路其实很简单,就是修改tables.sbn和和table.sbn模板,使得其继承接口*IVOFun*,通过该接口添加对应数据,并在加载数据时自动进行应用解析。
修改
tables.sbn和table.sbn模板下图就是默认模板所在的路径和我们需要的文件,文件夹里包含
bean.sbn,tables.sbn和table.sbn三个文件,我们只需要后面两个。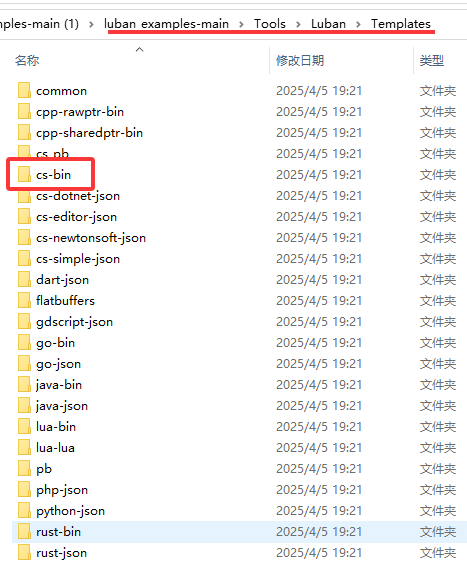
如下图在bat目录下创建文件夹
CustomTemplate再创建cs-bin文件夹,然后将默认的tables.sbn和table.sbn丢进去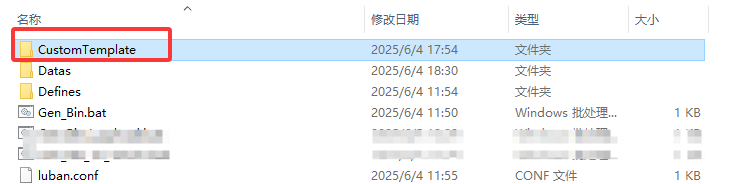
大佬关于修改模板的原理已经解释的非常详细了,这里就直接贴出修改后的模板代码,有些许不同可以自行比对。
首先是
tables.sbn然后是
table.sbn,其实只修改了一下构造函数,将构造函数拆分了。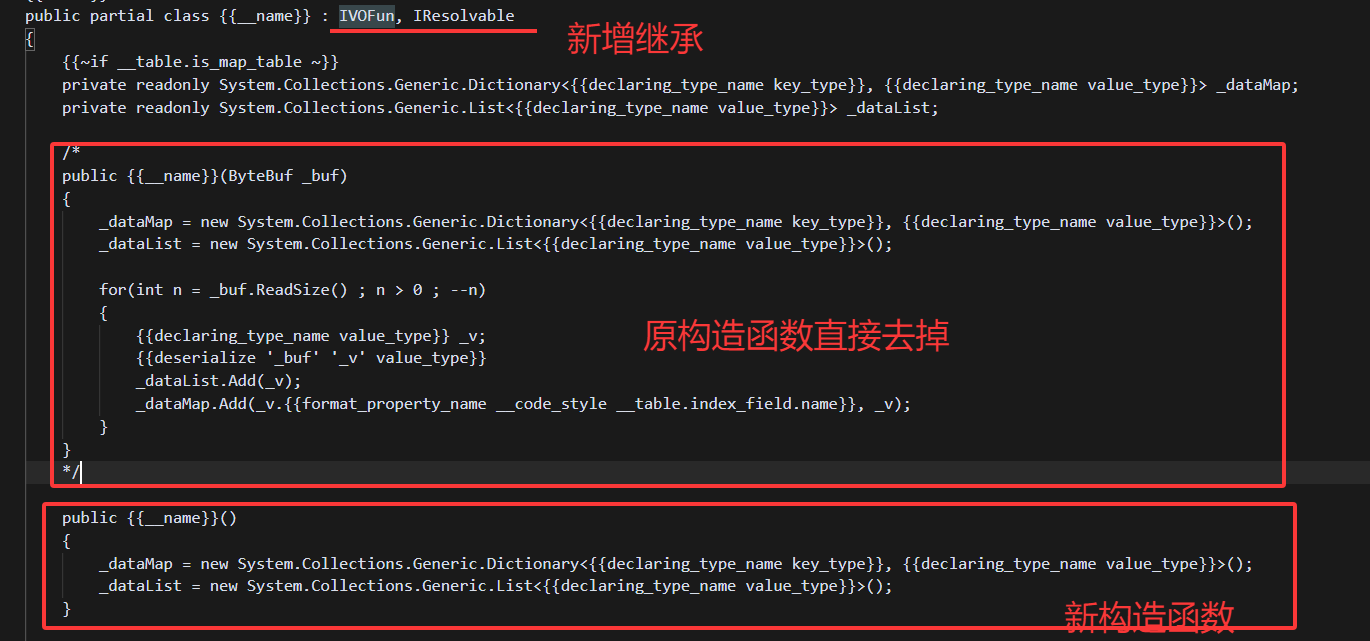
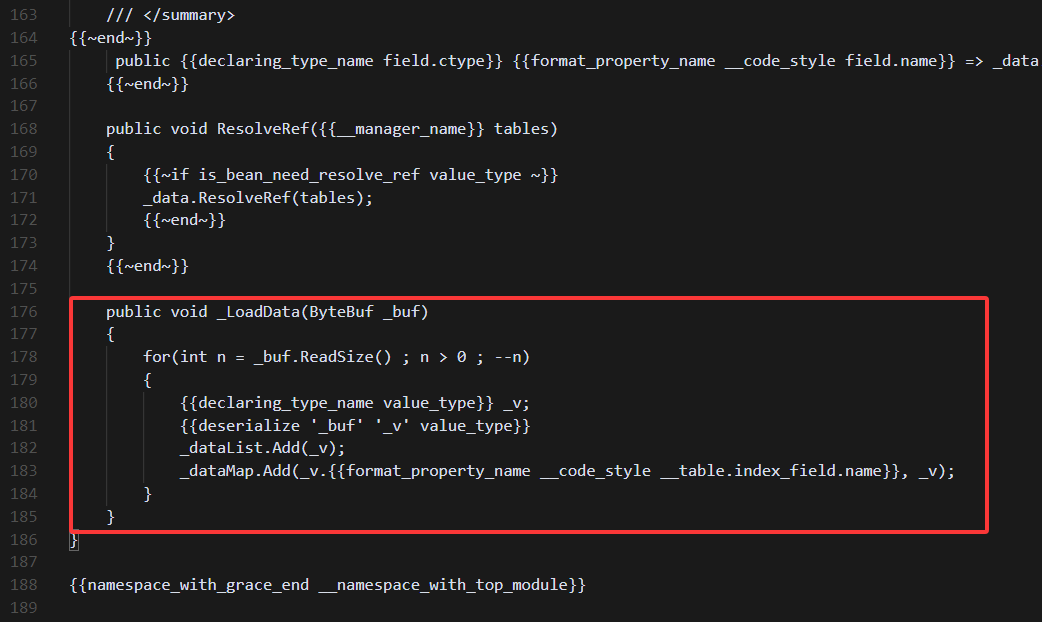
如上图所示,在末尾添加函数_LoadData
最后一步,修改bat代码,在
dotnet中添加一句--customTemplateDir %WORKSPACE%\CustomTemplate^,运行即可。修改管理类
核心就是将原本
Table做的事儿交给了这个类来做,变成自己管理一个字典去控制数据,每次取数据前看字典里是否有,没有则去加载,加载后再通过放射去进行一次引用解析,代码如下:1
2
3
4
5
6
7
8
9
10
11
12
13
14
15
16
17
18
19
20
21
22
23
24
25
26
27
28
29
30
31
32
33
34
35
36
37
38
39
40
41
42
43
44
45
46
47
48
49
50
51
52
53
54
55
56
57
58
59
60
61
62
63
64
65
66
67
68
69
70
71
72
73readonly Dictionary<string, object> tables = new Dictionary<string, object>();
public T GetVOData<T>(string fileName) where T : IVOFun, new()
{
if (tables.TryGetValue(fileName, out var cached))
{
return (T)cached;
}
//根据自己喜欢的方式获取文件路径
string path = $"{Application.dataPath}/xxx/{fileName}.bytes";
if (!File.Exists(path))
{
Debug.LogError($"Config file not found: {path}");
return default;
}
var data = new T();
//这里只是测试,最好换成其他方式,比如异步ab包加载等方式
var bytes = File.ReadAllBytes(path);
data._LoadData(new ByteBuf(bytes));
tables[fileName] = data;
// 关键点:动态构造 Tables 并自动填充属性
Tables tableContainer = new Tables();
Type tablesType = typeof(Tables);
foreach (var kv in tables)
{
string key = kv.Key; // 比如 "item_tbitem"
object value = kv.Value; // 表对象,比如 TbItem
string inferredPropName = TryGetTablePropertyName(value.GetType());
if (inferredPropName == null) continue;
PropertyInfo prop = tablesType.GetProperty(inferredPropName);
if (prop != null && prop.CanWrite)
{
prop.SetValue(tableContainer, value);
}
}
// 自动调用 ResolveRef(如果支持)
if (data is IResolvable resolvable)
{
resolvable.ResolveRef(tableContainer);
}
return data;
}
/// <summary>
/// 找出这个对象在 Tables 中的属性名
/// </summary>
/// <param name="tableType"></param>
/// <returns></returns>
private string TryGetTablePropertyName(Type tableType)
{
// 获取类名,比如 TbItem、TbTheme 等
string typeName = tableType.Name;
// 验证它是否存在于 Tables 类型中
var tablesType = typeof(Tables);
foreach (var prop in tablesType.GetProperties())
{
if (prop.PropertyType == tableType || prop.PropertyType.IsAssignableFrom(tableType))
{
return prop.Name;
}
}
return null;
}额外的优化思路
这里提供几个博主自己在使用时的思考,
对于小型项目,可以在设计表的时候不涉及互相引用,这样就可以不用管luban里的引用解析,加载了用就完事儿了。这里给一个参考代码
1
2
3
4
5
6
7
8
9
10
11
12
13
14
15
16public T GetVOData<T>(string fileName) where T : IVOFun, new()
{
if (tables.ContainsKey(fileName))
{
return (T)tables[fileName];
}
else
{
var data = new T();
//这里只是测试,最好换成其他方式,比如异步ab包加载等方式
var a = File.ReadAllBytes($"{Application.dataPath}/xxx/{fileName}.bytes");
data._LoadData(new ByteBuf(a));
tables.Add(fileName, data);
return data;
}
}也可以通过
switch-case之类的方法手动控制是否需要添加应用解析,因为博主懒得写就不贴了。强烈建议可以再添加异步加载Bytes文件流的方法。